So as the weather gets colder and my bank account doesn’t have the funds to continue on the Mustang for a while… back to playing with microprocessors. Yeah, I know I’m a geek… but who cares. I’ve continued reading about hobby electronics and robotics over the summer (Shout out to Mythbuster Grant Imahara). I found that there is a huge amount of information on the subject. For the hobbyist, the Ardunio development platform is all over the place and has a large number of add on ‘break out” boards. A break out board allows for additional functions to be added easily, be it GPS, Wireless, Ethernet… It seems endless.
I started searching for the best price to grab one to play with and I noticed that there wasn’t much to the boards. I did some further digging and realized I had all the parts I need to build my own. It wouldn’t be as fancy for nearly as pretty, but it would be functional and compatible.
A google search pointed me to http://itp.nyu.edu/physcomp/Tutorials/ArduinoBreadboard.
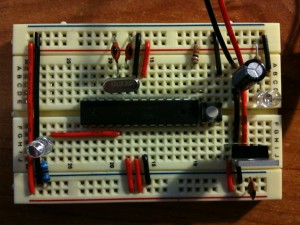
I put mine together pretty much like this example with a few exceptions. I only had the newer ATmega328 chips, but it’s basically the same chip with more flash. I also didn’t have 22pf capacitors, I did have 18pf laying around so I used those. Taking normal tolerances into consideration, I figured those should get me close enough for now. I popped all the pieces into my breadboard.

Although I now have what should be a functional Arduino clone, the chip has nothing on it. To be able to use the Arduino IDE which allows for quick development and deployment of your code, we need to put a boot-loader on the chip. Luckily, the Arduino IDE from www.arduino.cc, which is available for almost every OS, has this functionality built in. A boot-loader will allow you to load your code using just a serial cable (I’ll follow this article up with instructions on building your own for $5 or less). Now to put a upload a boot-loader to your chip you’ll need a programmer. I won’t go into details as Arduino’s website goes into detail over which are compatible. I have an AVRISPMKII which I picked up last year for about $30. From what I understand there are others that are cheaper and you can build yourself, google is your friend.

Now run the Arduino IDE.

Choose Tools –> Burn Bootloader and choose your boot-loader. I’ve chosen my AVRSIP MKII.
The AVR programmer will begin boot-loading your chip and the status bar will read “Burning bootloader to I/O Board (this may take a minute)…” You’ll likely see lights flicker on your programmer. Once it’s finished the status message will change to “Done burning bootloader.”
Your Arduino is now ready. You may now program your chip using the Arduino software. Power cycle your Arduino and it should start running a simple LED blink program with pin 13.
Stay tuned for a detailed “How to make an Arduino serial programming cable from a Nokia ca-42 phone cable”.
Leave a Reply